
Normally as far as a developer or an engineer is concerned setting up load balancing is an afterthought. When deadlines are approaching and budgets are tight the immediate priorities become rigging the application to ensure that it can at least deliver the following:
- Accepts the requests
- Processes the transactions
- Logs the details
- Sends notifications at process completion/failure
Types of Load Balancing
In general and irrespective of the number of clients or nodes in the environment there are 2 types of load balancing configurations:
Active – Active
In this mode all nodes handle traffic and an incoming client can be serviced by any node. This type of configuration is more concerned about providing the capacity to handle more traffic.
However, there are a few technical matters that must be taken into consideration before opting for this kind of setup. You have to start by assessing the networking protocols involved and determining whether they are stateless or stateful. In simple terms this decides whether multiple requests from a client need to be directed to the same server each time. This is important for applications that maintain transactions and also network protocols that track session state. For instance does a client expect to receive all replies from the same server where the sequence number is incremented on each packet?
For HTTP requests different servers could potentially reply if the underlying application does not track state. This may work well for a static website with no login requirements. However, if the site requires the maintenance of user accounts and session state then this no longer works and a load balancing scenario must make use of a sticky connection. This is because a single HTTP session can actually span multiple TCP/IP connections. Hence, if you were to hit a different server it would not have the cookie and session info and the user could experience a situation where they login and after reading a page or two they are being looped back to the login page even though they just signed in. There session is on node A but the load balancer just redirected them to node B where there is no session. In a case like the above session parameters and states would need to be persistent across all nodes or the load balancing scheme needs to ensure that clients always connect to the same for node on every request.
On the other hand for an SMPP application which does not maintain state beyond a single TCP/IP connection this would never be a problem. There would be no need for sticky sessions. A client could freely hit any server as every single connection will be a new session. The key is understanding the requirements imposed by the network protocols in effect as they ultimately decide what configuration is possible.
This brings us to the second factor in an all active configuration. That is how is data synchronized across nodes? This is not so much a network effect but more an application and database issue. If persistent data needs to be consistent for the type of service being delivered then we had better make sure our application is clustered and handle multiple read/writes asynchronously. So there may be the need for some replication or locking mechanism at the business logic layer.
Therefore, when all servers are primary one has ensure that the design handles the use of session state correctly or that previous requests from a user would be retrieved from the cache, rather than any resource intensive process on the server. A final concern is if your servers in this scenario are constantly under heavy load, and one or more servers is offline, the other(s) may become overloaded by the sudden load of the new connections as well as the existing traffic.
Active – Standby
Here the arrangement is more about redundancy. One server is dedicated as the primary server to handle all requests and if this server is offline/inaccessible/non-responsive, the requests will be sent to the secondary server. Much simpler right? No need to worry about sessions or previous requests. You can share persistent storage or keep the other node up to date with near real time replication.
This allows for the application to facilitate near 100% uptime for any unforeseen issues or planned upgrades.
Which Load Balancing Strategy is Best? How to Implement?
Whether to go with Active/Active or Active/Standy depends on the nature of the service but how to implement either is a different matter all together. Now, which approach should you take, using the Apache Load Balancer or an OS based or phyiscal IP Load Balancer?
It depends.
Apache Load Balancer
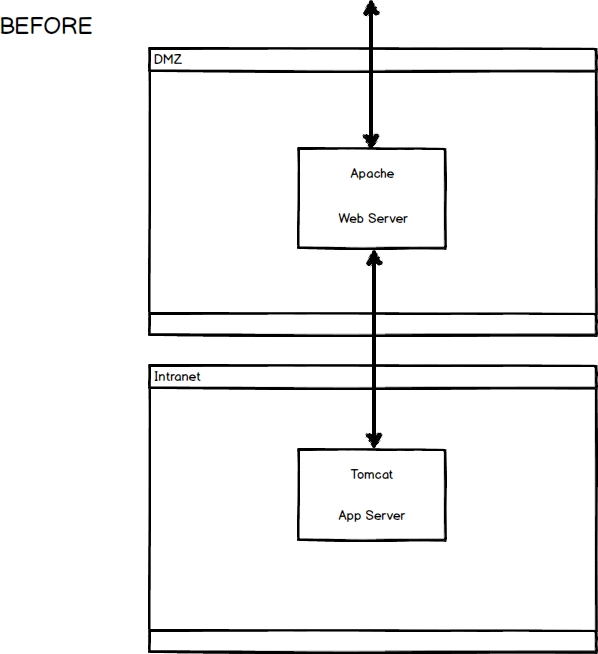
When using a web server proxy like httpd the architecture of the DMZ (De-Militarized Zone) becomes important. So, if you are more comfortable only having control of this segment, this approach is best for your load balancing implementation.
Below is a sample configuration of a Apache HTTPD Load Balancing proxy configuration in the main configuration for the virtual host accepting requests on port 80. This could be added to the httpd.conf or a sub configuration under the site-available depending on the UNIX/Linux distribution.
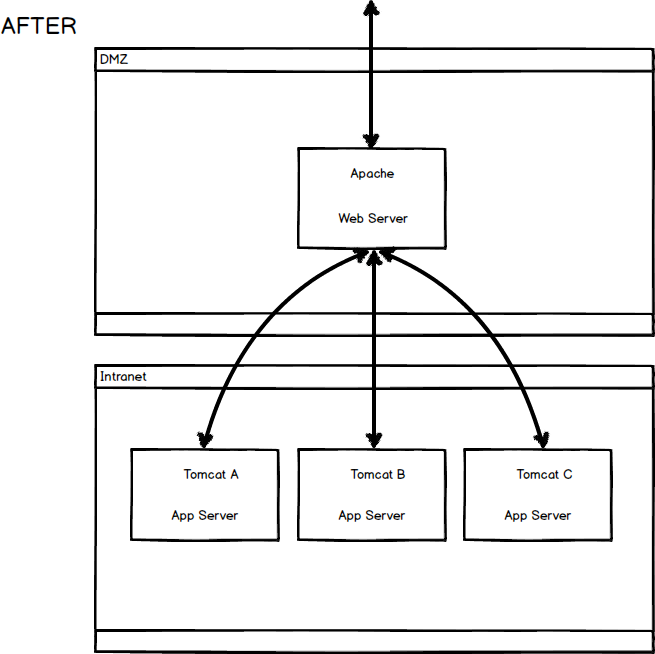
In this setup the apache web server acts as a middleman between the clients and the application servers. It will be a proxy for incoming requests to three Apache Tomcat application servers listening on hosts 101,102 and 103 on port 8809.
<VirtualHost *:80>
    ProxyRequests off

    ServerName servername.local

    <Proxy balancer://mycluster>
            # TomcatA
            BalancerMember ajp://172.20.20.101:8809 route=tomcatA
            # TomcatB
            BalancerMember ajp://172.20.20.102:8809 route=tomcatB
    	    # TomcatC
            BalancerMember ajp://172.20.20.103:8809 route=tomcatC


            # Security – to determine who is allowed to access
            # Currently all are allowed to access
            Order Deny,Allow
            Deny from none
            Allow from all

            # Load Balancer Settings
            # We will be configuring a simple Round
            # Robin style load balancer.  This means
            # that all nodes take an equal share of
            # of the load.
            ProxySet lbmethod=byrequests

    </Proxy>

    # balancer-manager
    # This tool is built into the mod_proxy_balancer
    # module and will allow you to do some simple
    # modifications to the balanced group via a gui
    # web interface.
    <Location /balancer-manager>
            SetHandler balancer-manager

            # I recommend locking this one down to your
            # administering location
            Order deny,allow
            Allow from all
    </Location>

    # Point of Balance
    # This setting will allow to explicitly name the
    # location in the site that we want to be
    # balanced, in this example we will balance "/"
    # or everything in the site.
    ProxyPass /balancer-manager !
    ProxyPass / balancer://mycluster/ stickysession=JSESSIONID|jsessionid nofailover=Off scolonpathdelim=On

</VirtualHost>
It is also important to note that since the traffic will be sent between both nodes (whether round-robin or any other format), they will need to share sessions to avoid invalid/unknown sessions. Therefore, if using Tomcat 7 as your App Server, the server.xml file will need to be edited by adding the “jvmRoute” parameter and stating the route from the web server to the app server as shown below.
TomcatA:
<!-- You should set jvmRoute to support load-balancing via AJP ie :-->
<Engine name="Catalina" defaultHost="localhost" jvmRoute="tomcatA">
TomcatB:
<!-- You should set jvmRoute to support load-balancing via AJP ie :-->
<Engine name="Catalina" defaultHost="localhost" jvmRoute="tomcatB">
TomcatC:
<!-- You should set jvmRoute to support load-balancing via AJP ie :-->
<Engine name="Catalina" defaultHost="localhost" jvmRoute="tomcatC">
Also, make sure the Cluster tags in server.xml are not commented out. Following the configuration changes, when starting up of the Web Servers, it is best to start them one at a time. This is because they will each attempt to check if there is another server already running with sessions activated, which can be confirmed by the logs.
IP Load Balancer
With this configuration both inside and outside of the DMZ will be affected. You will also need a solid understanding of all the layers of the network stack. Acronyms such as NAT, SNAT, VLANs will regularly appear in the conversation and trunking and routing should not be foreign concepts.
If basic networking and intermediate IP knowledge sounds like your cup of tea then this method will suit you and is likely preferred. The popular appliance manufacturers in this field are Cisco, Brocade and ofcourse F5 Networks.
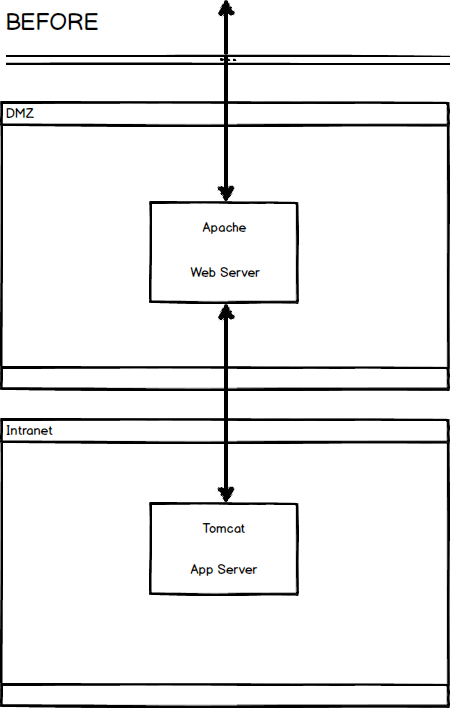
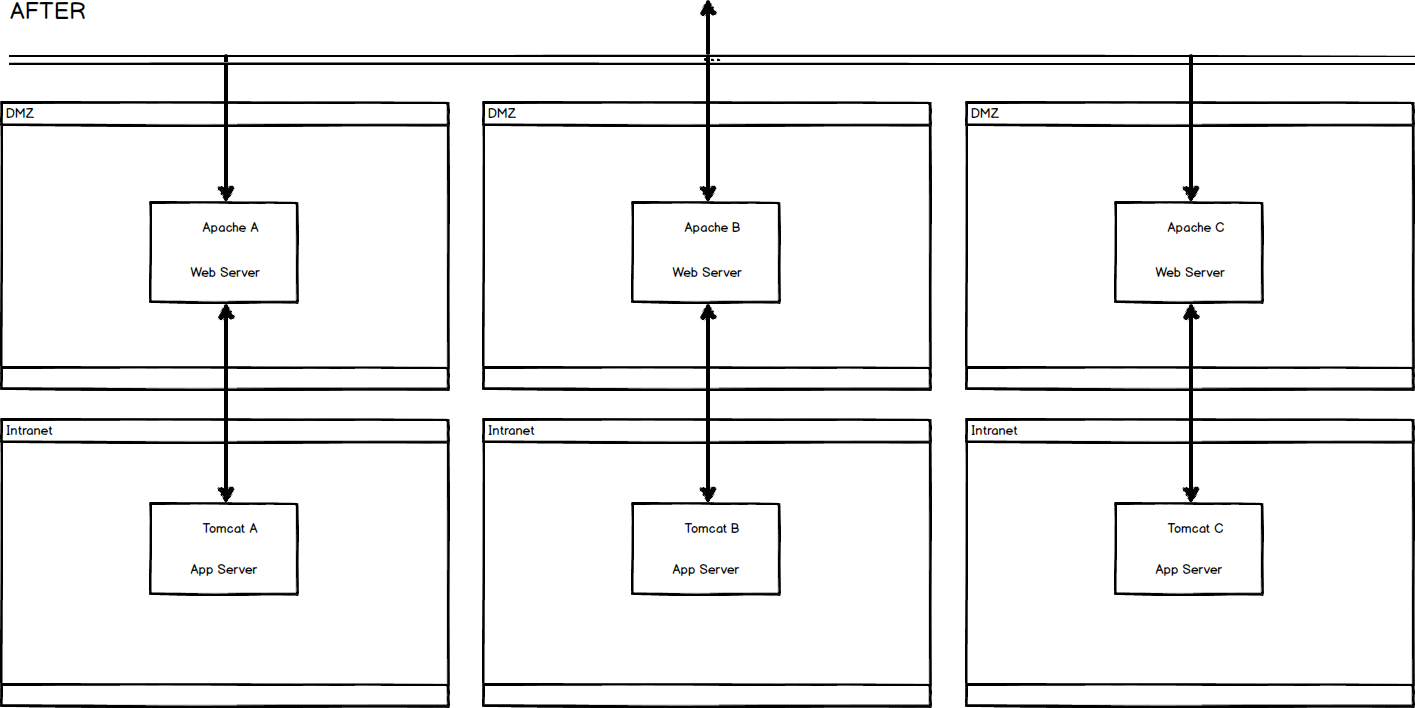
As the figures above show, initially, you would have to have 2 servers (1 for Apache Web Server in DMZ and 1 for App Server such as Tomcat) with the router just sending requests to their respective node. To expand the existing architecture, additional servers should be acquired and the router should be configured to send traffic to nodes accordingly with Apache sending traffic to the respective App server. Below is an example of a routing definition when configured for Load Balancing:
router> show ip route
[...]
I    192.148.25.0/24 [115/10] via 192.120.20.101
                     [115/10] via 192.120.20.102
                     [115/10] via 192.120.20.103
[...]
To sum up…
There are many reasons for wanting to setup a load balance architecture for your system. Whether it is that you need an active-active setup to just handle high load, or an active-standby setup for redundancy, or to have a setup to handle requests from different geographical locations. It all depends on what you are trying to accomplish.
In part 2 of this series we will walk you through setting up a Brocade ADX ServerIron appliance to load balance messaging traffic across four servers. Sign up to the newsletter to be notified when the new article is published.
Written by Jaemar Miller.