
When doing research, business intelligence or predictive modeling there is often a need to utilize data from external sources as input to the model being developed as a part of the analysis. This external data may be the primary dataset or could be in some instances an additional secondary dataset to be combined with other internal data from surveys, applications or databases to improve the insights and accuracy of the model. Frequently, this external data is hosted via websites and is accessible as a link or otherwise reachable through an API provided by an external endpoint at a specified URL. To use the data located at these URLs it needs to be extracted from the remote site and then stored and staged in a local repository.
Dealing with this kind of extraction is simple enough when one is only managing a small number of external data sources. For any small number of infrequently changing or accessed data sources it is perfectly fine to navigate to these links via one's browser and simply manually download the required information. However, if the data is spread over a large number of links, the website is difficult to navigate (eg. the site has many sub sections and directories), or the dataset is large and takes a lengthy time to download, and or the data links change regularly it quickly becomes infeasible to manually fetch the data from each source due to the complexity and scope of effort required. Therefore, it becomes essential to include some level of automation in the extraction process.
It is at this point, where having a tool like Python at your disposal can make a world of a difference. Python makes the impossible possible. Due to its natural language like syntax which facilitates ease of use and learning as well as its wide array of data parsing and HTTP libraries, python will allow you to quickly create a robot/bot that can traverse a website's links, identify the required asset/s and then execute one or more download operations to store the data at a pre-determined local repository. Having the data locally is usually a performance requirement to make external sources suitable for integration into the analytics process. Using a bot in this manner is called data scraping. Data scraping is a task that Python excels at.
The Example
In this post I am going to build upon a great article by Julia Kho and expand on her example to include building a map of locations to visit by using a sitemap.xml as well as enabling the script to change behaviour by accepting optional arguments passed via the command line interface. I will not delve into the details of how to do a basic setup of Python beyond noting that this post is using Python3. For newcomers to Python, it is normally natively installed on most Linux and Unix based systems including macOS. A minimal self contained distribution of Python can also be installed using miniconda for Windows or other systems that do not have Python preinstalled. The only external dependency that will be used is Beautiful Soup 4. This occurs at the below line found in the gh_scraper.py script.
from bs4 import BeautifulSoup
The bs4 library can be installed by pip on the your local machine if it is not present.
All code used in the post is open source and available at the GhostScraper repo. GhostScraper, which is the example I will be going through, uses the getopts function in python to process instructions about how to scrape data from Ghost blogs.
In the scenario that I am using GhostScraper to explain, scraping image data from a Ghost blog may be desirable for an author that is hosting their site with an external hosting provider service like the one that Ghost Pro provides. The problem arises when trying to create an offline backup of posts and other content on the site. The provider as a part of their service offering handles scaling and security etc from the blog which naturally also means they do not provide direct access to the backend servers delivering the service to the end user as a consequence. Therefore, the only available local backup solution if one doesn't want to be solely dependent on the provider is to utilize the native export function.
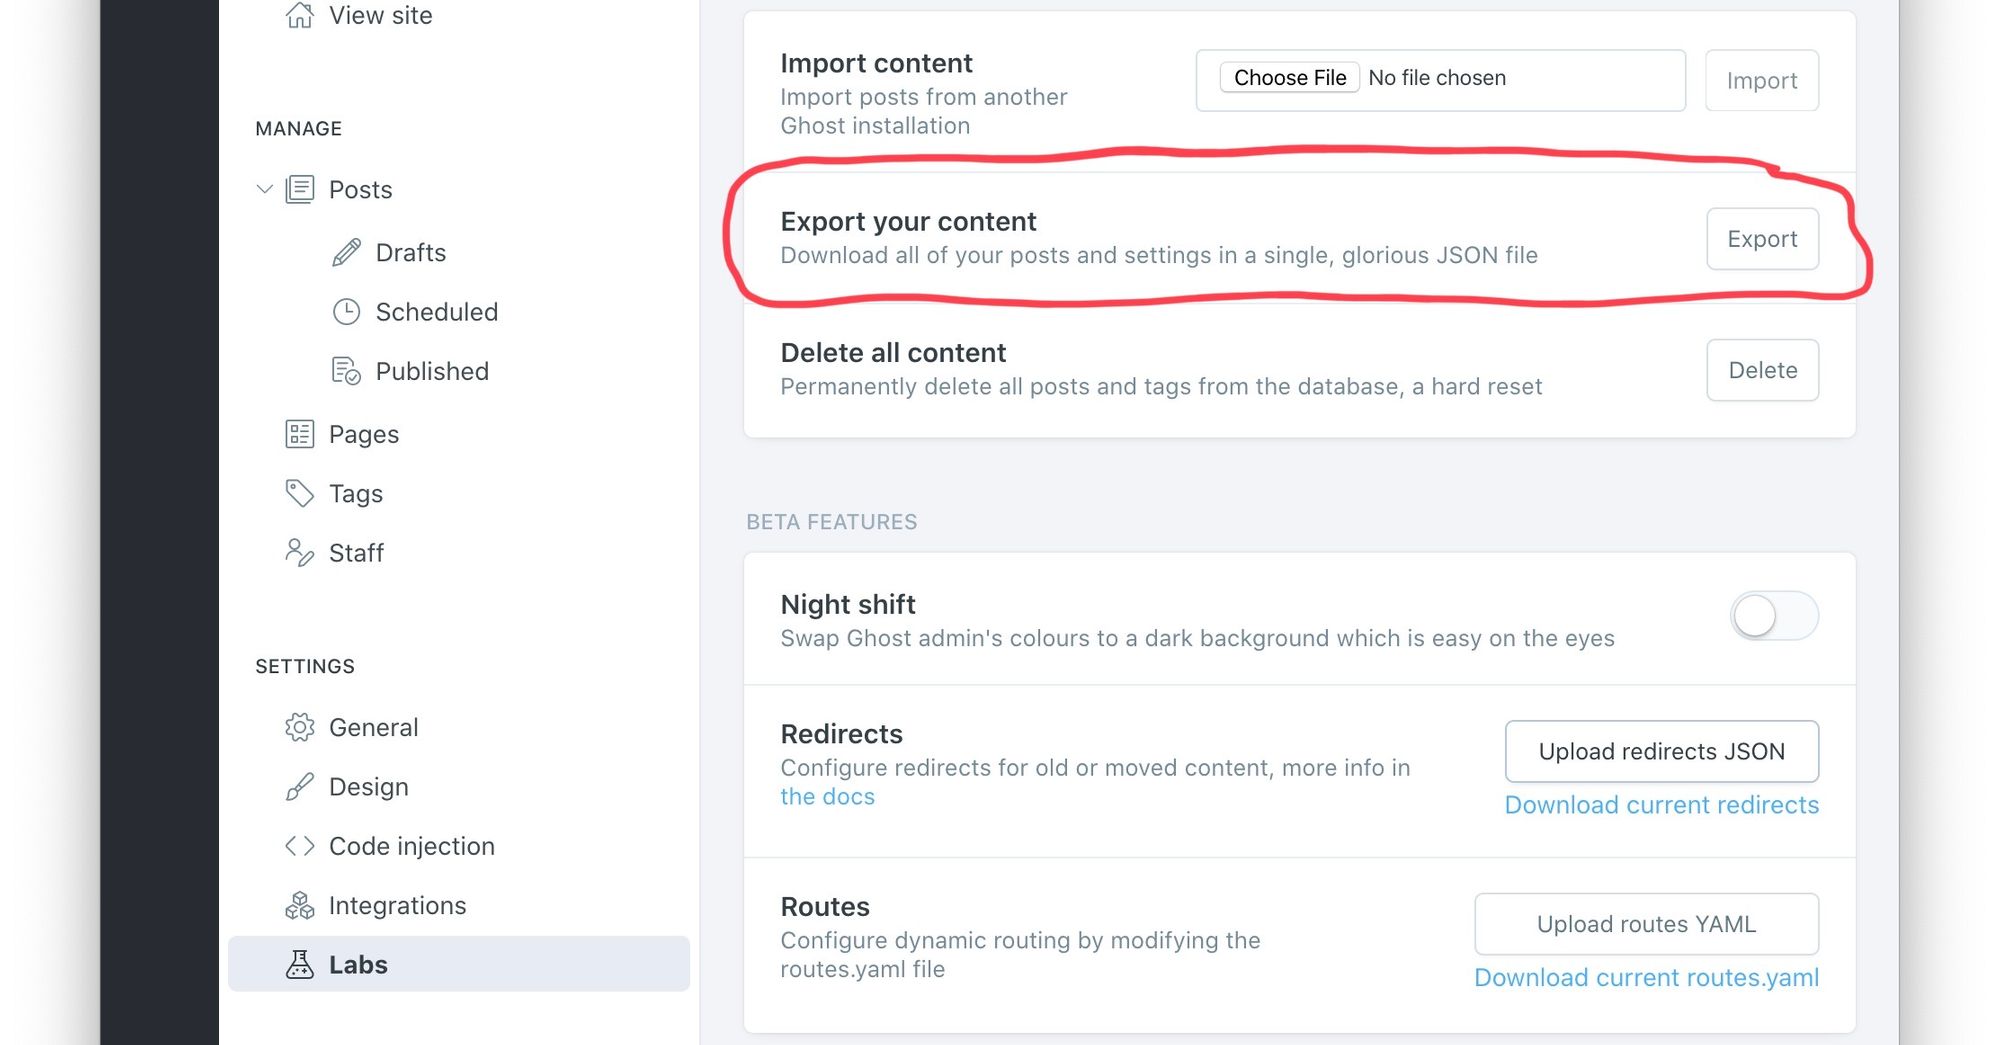
Unfortunately, this export function provides only a basic JSON formatted text dump of all article content excluding linked content or any image/video assets that may be embedded in a post. This means that should the author want to migrate services to a new platform they will not only have to import the text data for each article using the JSON dump but also have to manually download previously uploading images/videos and edit the links to point to the new service location per article. Clearly, this would be tedious process and is not feasible for all but the simplest of migrations with only 10s of posts.
To solve this dilemma, in the remainder of this post I explain how the above scenario is overcome by automating the backup of the image assets for the Ghost blog author using python.
Breaking down the code
To begin, let's take a look at the main function which is executed when this module is the primary module being processed by the interpreter as opposed to when it is imported by this line.
if __name__ == "__main__": main(sys.argv[1:])
Once control is passed to the main function it does a few things:
- Set the defaults for the global private property
_propertywhich is a dictionary map of the options for the scraper. - Executes a try/except block to process the arguments from the command line and return the usage message by running the
printUsagefunction if invalid arguments are passed. - Takes the target url which is always the last option passed at the command line to the scraper script and then builds the sitemap.xml location using this URL.
- Using a try/except block it passes the base sitemap to the
fetchmapsfunction to build the list of sitemaps to navigate. A site can have one or more sitemaps. - For each valid map found it determines the list of locations to visit. These destinations are locations specified in the sitemaps.
- For each location in each sitemap it fetches the assets by calling the
fetchAssetfunction that accepts a URI for the location as well as an HTML tag to parse as the second option. The name of the tag is determined by the-tor--tag=attributes as declared by the arguments togetopt
opts, args = getopt.getopt(argv,'hd:u:t:a:',['help','directory=','user-agent=','tag=','attribute='])
The python getopt function returns a tuple that contains a list of options passed to the script as well as the list of argument values associated with the options.
Next up is the fetchMap function.
def fetchMaps(url):
    print('Fetching sitemaps from ' + url)
    resp = requests.get(url)
    if(resp.status_code == 200):
        siteSoup = BeautifulSoup(resp.text,'xml')
        maps = siteSoup.findAll('sitemap')
        if len(maps) > 0:
            return maps
        else:
            return []
As mentioned previously, sitemaps, are used by the scraper to understand the site navigation and build out a list of places within the site to visit to scrape for assets. Sitemaps are xml files that specify either a series of other sitemaps using the <loc></loc> tags inside of the <sitemap></sitemap> tags or alternatively list out a series of URLs to naviagte using a <loc></loc> embedded in <url></url> tags.
The relevant base sitemap is retrieved from the url variable by using the get method from the requests object to to make an HTTP GET request. The response is then stored in a special object that is assigned to the resp variable. Since XML data is text the data payload from the initial request can be safely obtained from the resp.text attribute of the response object. An HTTP status_code == 200 means the initial request was successful. If the status code indicates a failure then an empty list is returned to signify that not maps could be found.
To decipher the XML correctly the function utilizes the bs4 `findAll` function which returns a list of matching xml nodes.
Function fetchLocations is very similar to fetchMaps with the only difference being that the returned list contains the XML URL elements versus the sitemap elements. As the input to fetchLocations is a sitemap node element the function first uses the find method in bs4 to obtain the loc child node of the sitemap and then uses the bs4 findall to fetch all the url nodes.
The final function is fetchAsset which takes as input an HTML tag name as well as a single XML url node object in the format produced by bs4. The process of fetching the pages at the URL is very similar to the previous examples with a few notable differences.
First, the parser used is switched from XML to HTML. HTML is the default format for webpages whereas XML is the default markup language format for the sitemaps.
if(locURLData.status_code == 200):
        locHTML = BeautifulSoup(locURLData.text, 'html.parser')
        locElems = locHTML.findAll(str(type))
Second, some string formatting is done with the python string split function and the headers for the HTTP requests that will be sent are manipulated to include a User-Agent field. This part is necessary as some sites check the user agent and will block requests from unrecognized client agents. By setting this header field we can fool them into thinking our bot is Mozilla, Safari, Chrome or any other browser for that matter.
req = urllib.request.Request(assetURL, headers={'User-Agent': UA})
                assetLocation = urllib.request.urlopen(req)
                assetData = assetLocation.read()
In the code above, after the UA is set, a connection is opened to the remote location using the urllib.request.urlopen function. The data is then streamed to a buffer and finally saved to the assetData variable when the end of file (EOF) for the payload is detected by calling the read function on the open connection assigned to the assetLocation variable.
Last, now that the asset data has been retrieved and is stored in memory in our assetData variable it is necessary to persist this to permanent local storage on the file system. This is achieved by using the os module that has handy open, write and close functions to manipulate file handles and access and write data to files managed by these handles in the Operating System.
print('Writing to ' + assetFPath)
os.makedirs(os.path.dirname(assetFPath), exist_ok=True)
with open(assetFPath, "wb") as f:
    f.write(assetData)
    f.close()
    assetMap[assetURL] = assetFPath
Conclusion
Let's demonstrate by closing with an example to put everything together. Running the following in the terminal
python3 ~/Developer/GhostScraper/gh_scraper.py -d . -t img https://blog.codinghorror.com
should produce a result close to the example below picture that shows a data scrape for images on blog.codinghorror.com a popular blog about programming run by Jeff Atwood that is built with Ghost.
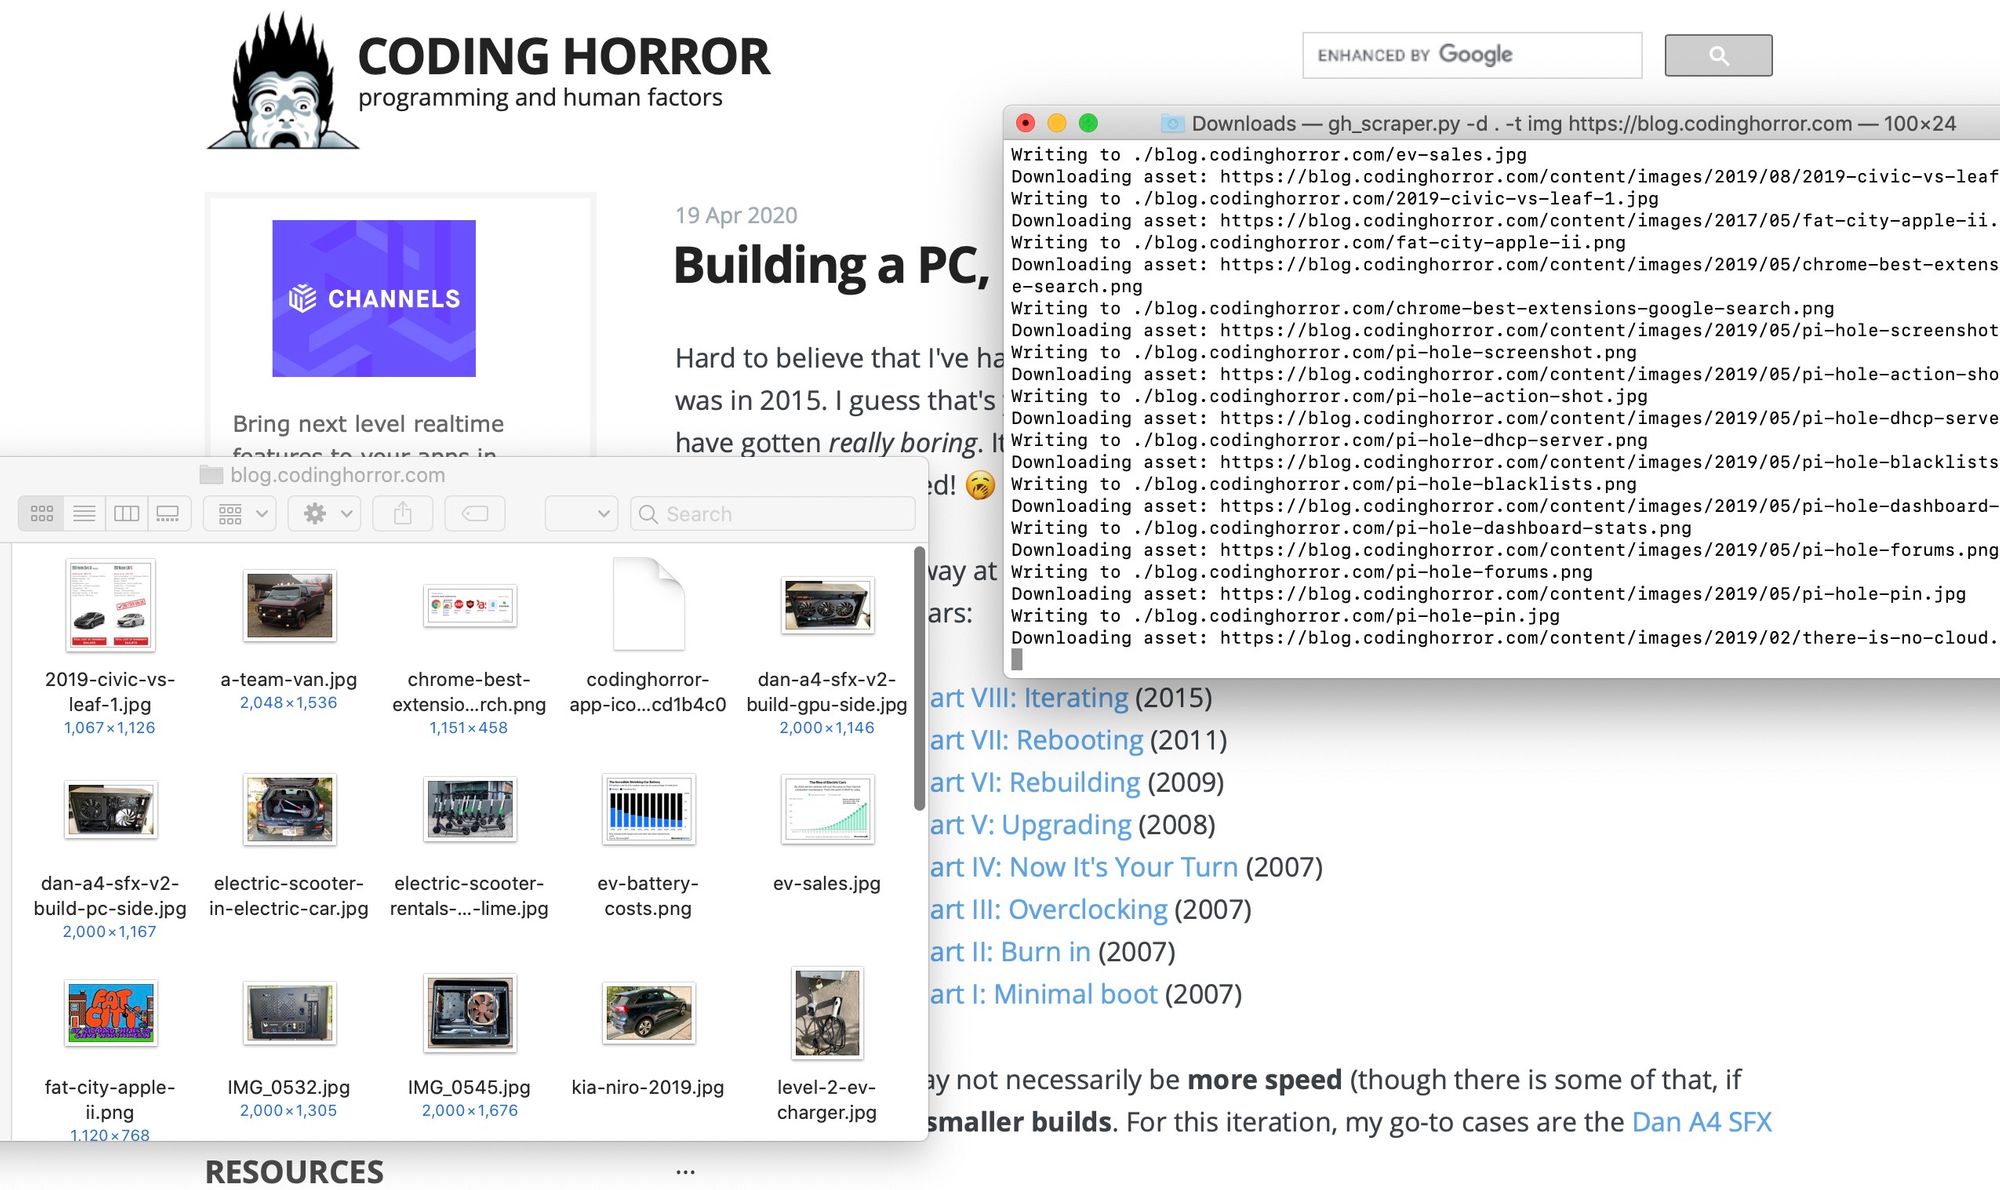
When run with the options above the script navigates all the links on the blog and saves all the images from the site to the working directory. The latest version and full code for the scraper python script can be downloaded at this link.
Cover Photo by Fredy Jacob on Unsplash
Written by Nneko Branche.