
You know what a Linux cluster is. We told you why people use them and how they make our lives better. If you intend to deploy one on CentOS 7 Linux/Red Hat Enterprise Linux 7 read our guide for version 7 for version 6 and below continue reading this guide.
Now lets go put this into action and create our own badass little cluster from scratch. Are you ready to be a cluster guru? Your unix commandline ninja skills will come in handy here but they are not strictly needed. Ready or not it's time to dive right in!
Setting up the lab
The First Thing First
We need to install our operating system. As this tutorial will create the HA cluster using Red Hat Cluster suite we need to use a Red Hat Based OS. Our OS of choice will be CentOS Linux version 6.
CentOS Linux is a freely available solution with close compatibilty with RHEL. While all the cluster software is open source and can be compiled and configured on other distributions of Linux bringing all the components together and getting them working on other distributions may take some effort. Such an activity is really only a worthy exercise for those enthusiasts among us with time on their hands and many hours to burn.

In all likelihood RHEL and RCS is the variant that you will encounter in the enterprise and wider working world where 24x7 support and compatbility are valued. To use RHEL with access to the software repository and software you will need a subscription but as our budget is limited. Therefore, this has guided our choice of OS because not only is our budget small but we also want to allow the maximum amount of people to follow along this tutorial. Hence our decision to deploy on CentOS Linux. CentOS Linux is as kickass a substitute for RHEL as you will ever get while still remaining completely free. Fedora could have been a good choice as well but we decided to be more conservative and not too radical. Now go ahead and download Cent if don't have it already.
That Second Thing Second

Increasingly, the IT landscape is going virtual mostly related to factors such as costs, speed of provisioning, and flexibility. We for this tutorial will be no different and like it or not we are joining that bigger IT trend/bandwagon. Besides it means people running non Linux environments on the desktop/laptop (pretty much everyone out there) can participate and try this out in the safety and comfort of the virtual sandbox. Not to worry, you will be able to follow along just fine if you have the baremetal to spare. For baremetal installs please skip the rest of this section but ensure that you have the prerequisites below covered.
Essential Prerequisites
- Two nodes with CentOS or RHEL installed
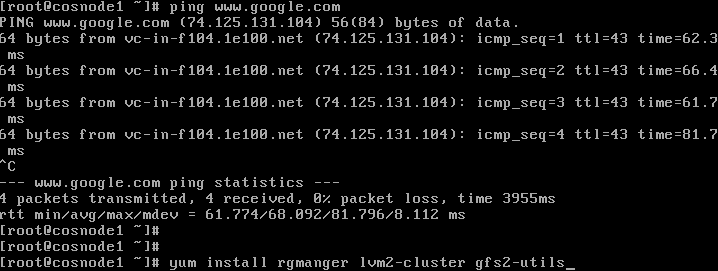
- rgmanager, lvm2-cluster, gfs2-utils, and ccs packages installed on each node
- Shared storage with simultaneous read/write access from each node to the same LUN
- Two IP interfaces and networks. One for client access and One for heartbeat traffic
- Power fence device that can be triggered over the network and integrated with fenced.
- Shared LUNs needed:
- data (shared database files) - size is user determined
- docroot (shared webserver document root) - size user determined
- quorum disk (shared quorum disk device) - appox. 20mb
Our hypervisor of choice is Oracle VirtualBox as it is free and has just the right amount of features to accomplish what we need. Note, that everything we do will be essentially mirrored if this were a production environment running VMware ESX but the procedure followed would be different. Where possible I will try to highlight what would be needed if your testbed were an ESXi node.
VirtualBox Configuration
The end goal will be to create a 2-node HA cluster called "example-cluster." Yes this is a boring name but you are free to rename yours to anything you like just remember to replace example-cluster with your name once we reach the configuration section. The list below details all the components that will be created.
- Virtual Machine (VM) named cosnode1 with hostname node1
- VM named cosnode2 with hostname node2
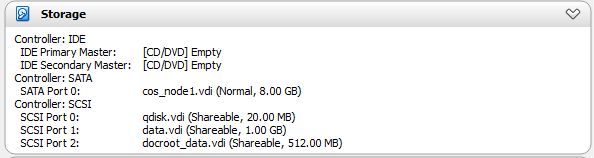
- Shared disk device data.vdi that will host the database files
- Shared disk device docroot_data.vdi that will host the webserver files
- Shared disk device qdisk.vdi that will act as our quorum disk
- Two Host Only internal networks
Creating shareable disks in VBox
By default, for your safety, the hypervisors lock the underlying raw devices and also virtualize the commands being send to those devices. What this means is that you cannot assign the same raw device to multiple VMs as this would inherently cause a conflict. In the case of storage if two systems write to a non cluster aware storage device they could overwrite the same blocks or have incompatible updates to the filesystem table resulting in data corruption.
However, being mature Men or Women and soon super guru's we don't need to be babysitted by the hypervisor as we will be using a distributed lock manager (DLM) and a cluster aware filesystem GFS. Consequently, the safety pins have to be unlocked and take the gloves must come off. The options needed to allow this "dangerous behaviour" in VirtualBox are not available from the GUI. We will need to find that command prompt or shell and make friends with VBoxManage
The process is a three phase one:
- Add an new storage controller to each VM. In this example we use a SCSI controller named "SCSI." this step is optional if you use an alternate fencing method in the following sections. This is required to utilize SCSI fence. If skipped, remember to replace the controller in below command snippets with the one matching your setup
- First create the disk from the CLI using a fixed size and specifiying a few extra parameters
- Attach the disk device to the virtual machine using the correct controller and marking it as a shareable device
Create Shared Hard Disks
VboxManage createhd --filename <new disk name> --size <size in mb> --variant Fixed
Replace the contents in <> with the variables appropriate for your environment. Create 3 disks called "qdisk", "data", and "docroot_data."
If all goes well you will see output similar to the following.
Sample output for createhd:

Attach Hard Disk
VBoxManage will be used again to attach the previously created HDs from above to the VMs cosnode1 and cosnode2.
VboxManage storageattach <VM> --storagectl <VM Storage Controller> --port <SCSI/SATA port #> --device <device # usually 0> --type hdd --medium </path/to/vdi> --mtype shareable
Sample storageattach output for cosnode1:

Finally modify the type of the disk attached to the VM.
VBoxManage modifyhd </path/to/vdi> --type shareable
The VMs should now both be sharing the same disks.
Create Virtual Network
Networking is important to the functioning of the cluster. The next step is to create two virtual networks for use by our cluster. It is recommended that the cluster use only static IP addresses and no dynamic address protocols such as DHCP.
VM Configuration
When the VM configuration is completed it should map close to this example.
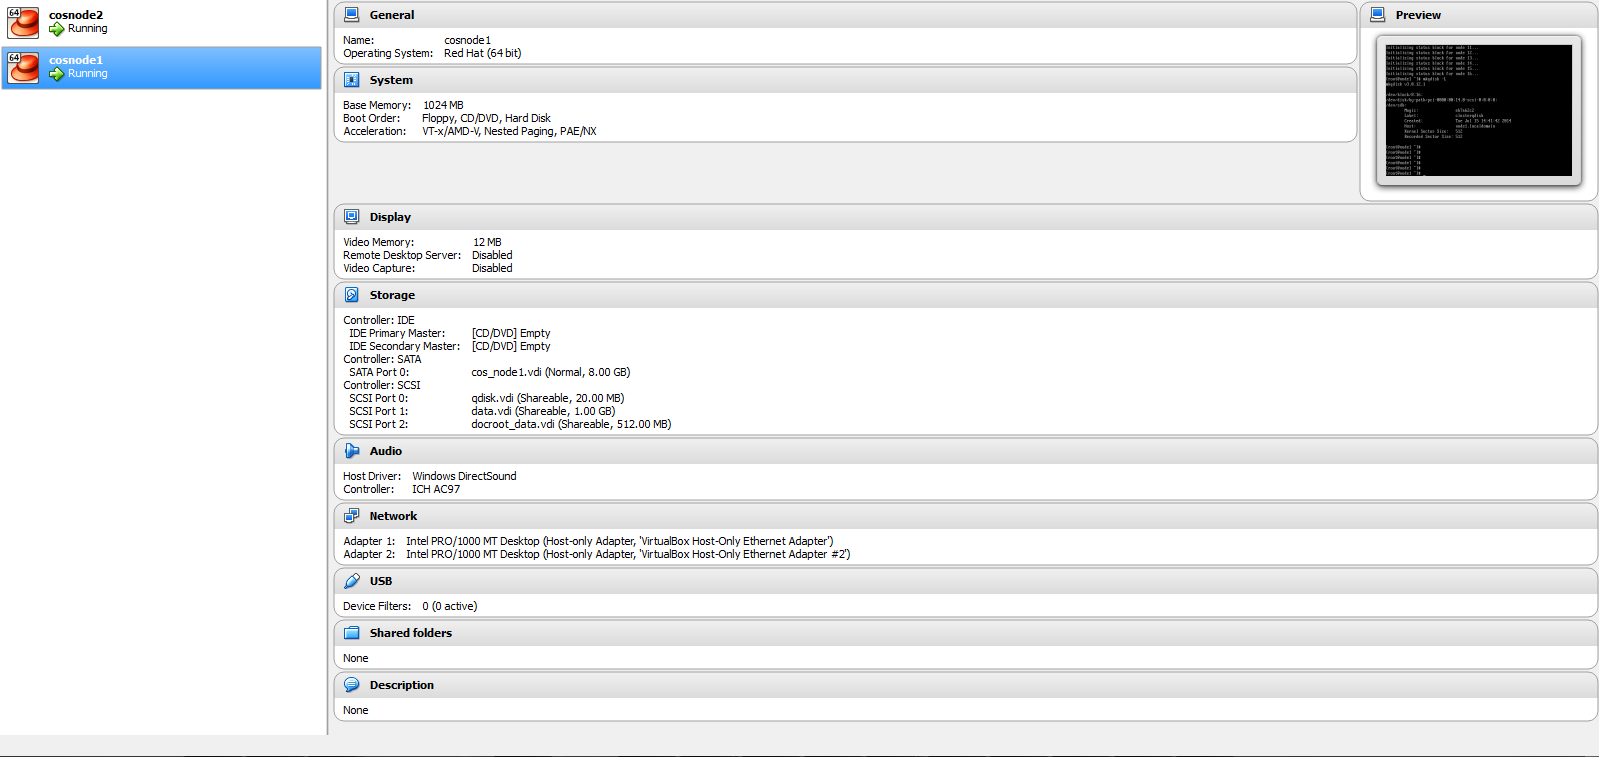
If you have gotten to this point you now have a working two node Linux cluster configuration running CentOS up top of Oracle VirtualBox. Congratulate yourself and keep going :)

Package Installation
As stated previously before we can create the cluster the software has to be downloaded and the images deployed onto the OS. So, lets go ahead and do this step.
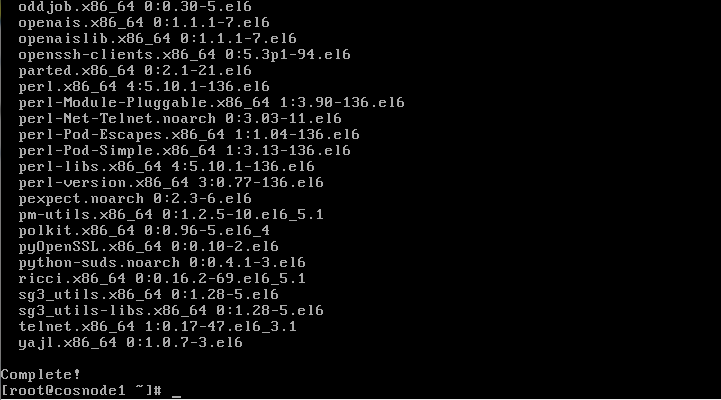
yum install rgmanager, lvm2-cluster, gfs2-utils, ccs
Confirm the dependencies and changes needed.
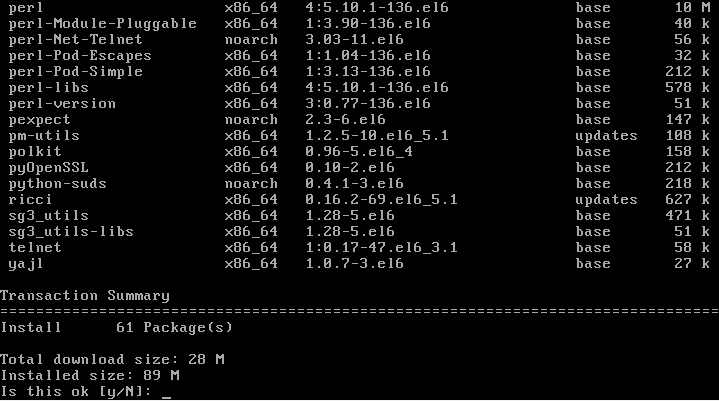
the package installation should complete successfully. Review the results.
Firewall Updates
Next, we must update the builtin iptables firewall rules to allow the cluster services to communicate and function. The required rules are presented below for each cluster process
#cman
-A INPUT -m state --state NEW -m multiport -p udp -s 192.168.230.0/24 -d 192.168.230.0/24 --dports 5404,5405 -j ACCEPT
-A INPUT -m addrtype --dst-type MULTICAST -m state --state NEW -m multiport -p udp -s 192.168.230.0/24 --dports 5404,5405 -j ACCEPT

#dlm
-A INPUT -m state --state NEW -p tcp -s 192.168.230.0/24 -d 192.168.230.0/24 --dport 21064 -j ACCEPT

#ricci
-A INPUT -m state --state NEW -p tcp -s 192.168.230.0/24 -d 192.168.230.0/24 --dport 11111 -j ACCEPT

#modclusterd
-A INPUT -m state --state NEW -p tcp -s 192.168.230.0/24 -d 192.168.230.0/24 --dport 16851 -j ACCEPT

#luci
-A INPUT -m state --state NEW -p tcp -s 192.168.230.0/24 -d 192.168.230.0/24 --dport 8084 -j ACCEPT

#igmp
-A INPUT -p igmp -j ACCEPT

COMMIT
Note, that we have chosen to use 192.168.230.0/24 as our heartbeat network and 192.168.10.0/24 for client access traffic. Change the network addresses in the rules above to match the values relevant to your lab configuration to allow the cluster services on the heartbeat network. They should be appended to the files /etc/sysconfig/iptables for IPv4 or /etc/sysconfig/ip6tables for IPv6.
Once the rules file has been updated the iptables services must be restarted for the changes to take effect.
service iptables restart;
service ip6tables restart;
Quorum Disk
In simple terms quorum in a cluster refers to when there are half the total votes present plus 1 to form a majority. Members are each assigned a vote and in addition special devices can also be assigned a vote. The number of votes assigned to each node and cluster device is specified during the configuration.
Quorum is essential as it is the mechanism used by the cluster software to determine if the cluster is in a healthy enough state to be allowed to run services. When quorum is lost the cluster first tries to recover by fencing unhealthy nodes or relocating services. If all fails and quorum cannot be maintained all services are stopped and moved to the failed state, resource groups are put offline and the cluster is dissolved.
For a 2-node cluster such as the one we are creating in this lab a special block disk device known as a qdisk or quorum disk is essential to maintain quorum in instances where an unexpected event occurs such as a network outage. Split Brain is the phrase used to describe the scenario in which communication is lost between half the members and the cluster is evenly divided. During a split brain members can talk to nodes that fall on their side of the divide but not to nodes across the other side of the divide.
The problem with splitbrain scenarios become evident when each half of the cluster tries to take over control. In situations like these we can have unpleasant cases where nodes fence each other simultaneously and what is known as a fence race occurs until the cluster is normalized. Obviously services will be disrupted because nodes are rebooted and or access to resources are blocked. As the number of nodes in a cluster increase the likelihood of splitbrains occuring is significantly reduced. However, for a 2-node cluster any interruption automatically results in a split brain and therefore having another means of supplying votes needed in mediating cluster quorum is necessary. Our qdisk provides this tie-breaker vote and is required for 2 nodes despite the added complexity it brings to the configuration.
To create the quorum disk we specifiy our raw device and give it a label. We will use the 20mb disk /dev/sdb as our qdisk.
mkqdisk -c /dev/sdb -l clusterqdisk
Creating the Cluster
Update the host file and DNS with the cluster names
During cluster creation the members will be referred to using their nodenames on the network. These names must be either updated in the DNS or local host file to ensure that domain name resolution works.
Add these entries to the /etc/hosts file on all nodes. Replace the addresses with values relevant for your setup.
192.168.230.2 node1-hb node1-hb.localdomain
192.168.10.2 node1 node1.localdomain
192.168.230.3 node2-hb node2-hb.localdomain
192.168.10.3 node2 node2.localdomain
192.168.10.4 example-cluster example-cluster.localdomain
Cluster creation with ccs
ccs is a command line tool that will generate our cluster configuration while also activating and synchronizing the configuration files across all members in the cluster. Cluster configuration is stored in XML format in the /etc/cluster.conf file.
Assign a password to the ricci user. ccs using the ricci service to update and synchronize the configuration. Use the same password across all nodes.
passwd ricci
Start the ricci service on both node1 and node2
service ricci start
First we create the cluster on node1 by specifiying the clustername. This is will also generate our cluster.conf
ccs -h localhost --createcluster example-cluster
Add our nodes to the cluster. Use the names associated with our heartbeat network.
ccs -h localhost --addnode node1-hb.localdomain;
ccs -h localhost --addnode node2-hb.localdomain;
Our configuration should now look like the following
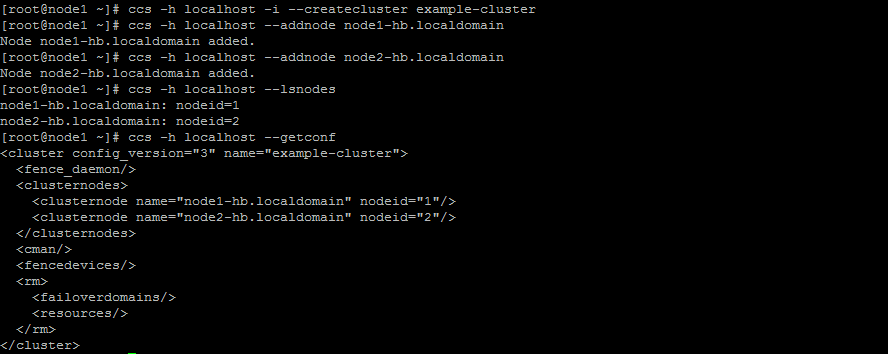
It is now time to synchronize the configuration to the other member node2.
ccs -h localhost --sync --activate
Fencing Configuration
Broadly speaking the following fencing options are available.
-
Power Fencing is equivalent of pulling the physical power cable or flipping a power switch. An ILOM or PDU that is controlled over the network can be utilized for power fencing. When nodes are power fenced it results in the node power cycling.
-
Network Fencing disables a network interface. Useful for storage that is accessed over the network such as iSCSI or Fibre Channel over ethernet
-
SCSI-3 Persistent Reservations locks a SCSI device by issueing a persistent reservation. That is it deletes are all previous reservations except one stopping the next device from gaining access.
-
Virtual Host Fencing is similar to Power Fencing except that the power switch is controlled by contacting the hypervisor host instead of the power switch/PDU/ILOM directly.
To view the fencing options available on the host run the following ccs command.
ccs -h localhost --lsfenceopts
Results should mirror the below.
fence_apc - Fence agent for APC over telnet/ssh
fence_apc_snmp - Fence agent for APC over SNMP
fence_bladecenter - Fence agent for IBM BladeCenter
fence_bladecenter_snmp - Fence agent for IBM BladeCenter over SNMP
fence_brocade - Fence agent for Brocade over telnet
fence_cisco_mds - Fence agent for Cisco MDS
fence_cisco_ucs - Fence agent for Cisco UCS
fence_drac - fencing agent for Dell Remote Access Card
fence_drac5 - Fence agent for Dell DRAC CMC/5
fence_eaton_snmp - Fence agent for Eaton over SNMP
fence_egenera - I/O Fencing agent for the Egenera BladeFrame
fence_eps - Fence agent for ePowerSwitch
fence_hpblade - Fence agent for HP BladeSystem
fence_ibmblade - Fence agent for IBM BladeCenter over SNMP
fence_idrac - Fence agent for IPMI over LAN
fence_ifmib - Fence agent for IF MIB
fence_ilo - Fence agent for HP iLO
fence_ilo2 - Fence agent for HP iLO
fence_ilo3 - Fence agent for IPMI over LAN
fence_ilo4 - Fence agent for IPMI over LAN
fence_ilo_mp - Fence agent for HP iLO MP
fence_imm - Fence agent for IPMI over LAN
fence_intelmodular - Fence agent for Intel Modular
fence_ipdu - Fence agent for iPDU over SNMP
fence_ipmilan - Fence agent for IPMI over LAN
fence_kdump - Fence agent for use with kdump
fence_pcmk - Helper that presents a RHCS-style interface to stonith-ng for CMAN based clusters
fence_rhevm - Fence agent for RHEV-M REST API
fence_rsa - Fence agent for IBM RSA
fence_rsb - I/O Fencing agent for Fujitsu-Siemens RSB
fence_sanbox2 - Fence agent for QLogic SANBox2 FC switches
fence_sanlock - Fence agent for watchdog and shared storage
fence_scsi - fence agent for SCSI-3 persistent reservations
fence_virsh - Fence agent for virsh
fence_virt - Fence agent for virtual machines
fence_vmware - Fence agent for VMWare
fence_vmware_soap - Fence agent for VMWare over SOAP API
fence_wti - Fence agent for WTI
fence_xvm - Fence agent for virtual machines
If you are running VirtualBox from a unix host then you can write a script to issue a power cycle over ssh using the VBoxManage command. Two good examples of such a script can be found at http://meinit.nl/virtualbox-fencing-and-red-hat-enterprise-linux-cluster-suite and http://www.redlinux.org/simple/?t561.html. My thanks go out to reader Brain Adams for doing the research and sharing the above links.
Alternatively I will show you how to use the fence_scsi module to create a SCSI-3 persistent reservation fence device we will called "scsifence". Note that SCSI-3 persistent reservations are not support in VBox and as such it will not work. Fencing is required for the proper functioning of a cluster but for our test purposes we will skip it this time only.
Take a look at the options available for fence_scsi
 #ccs -h localhost --lsfenceopts fence_scsi
  fence_scsi - fence agent for SCSI-3 persistent reservations
  Required Options:
  Optional Options:
    option: No description available
    aptpl: Use APTPL flag for registrations
    devices: List of devices to be used for fencing action
    logfile: File to write error/debug messages
    delay: Wait X seconds before fencing is started
    key: Key value to be used for fencing action
    action: Fencing action
    nodename: Name of node
Creating the fence device
This section is just for reference as scsi fencing will not work under VBox. Please use power fencing instead or skip to part 3.
A device named "scsifence" will be added to our cluster to provide SCSI storage based fencing for devices /dev/sdb, /dev/sdc, /dev/sdd.
ccs -h localhost --addfencedev scsifence agent=fence_scsi logfile=/var/log/cluster/fence_scsi.log devices=/dev/sdb,/dev/sdc,/dev/sdd
Registering the fence devices with each node.
To register a fence device a method and then a fence instance must be created.
ccs -h localhost --addmethod FENCE-SCSI node1-hb.localdomain;
ccs -h localhost --addmethod FENCE-SCSI node2-hb.localdomain;
ccs -h localhost --addfenceinst scsifence node2-hb.localdomain FENCE-SCSI;
ccs -h localhost --addfenceinst scsifence node1-hb.localdomain FENCE-SCSI;
For the example above the method is "FENCE-SCSI" and is associated with instances of "scsifence"
The configuration will now resemble this XML.
<cluster config_version="12" name="example-cluster">
  <fence_daemon/>
  <clusternodes>
    <clusternode name="node1-hb.localdomain" nodeid="1">
      <fence>
        <method name="FENCE-SCSI">
          <device name="scsifence"/>
        </method>
      </fence>
      <unfence>
        <device action="on" name="scsifence"/>
      </unfence>
    </clusternode>
    <clusternode name="node2-hb.localdomain" nodeid="2">
      <fence>
        <method name="FENCE-SCSI">
          <device name="scsifence"/>
        </method>
      </fence>
      <unfence>
        <device action="on" name="scsifence"/>
      </unfence>
    </clusternode>
  </clusternodes>
  <cman/>
  <fencedevices>
    <fencedevice agent="fence_scsi" devices="/dev/sdb,/dev/sdc,/dev/sdd" logfile="/var/log/cluster/fence_scsi.log" name="scsifence"/>
  </fencedevices>
  <rm>
    <failoverdomains/>
    <resources/>
  </rm>
</cluster>
Now that we have a skeleton cluster it's time to synchronize our configuration again!
ccs -h localhost --sync --activate
Take a break and review what we have done so far. In the next episode of this series we will create our logical volumes, format them with GFS and register these as cluster resources as well as create the corresponding service groups and dependency trees.
Stay tuned. You can also chose to take a step back and review Part 1 again or move on to Part 3 in the series.
Written by Nneko Branche.